Redux State Management in LWC (Lightning Web Components)

Redux is a predictable state container for JavaScript applications. It helps you write applications that behave consistently, run in different environments (client, server, and native), and are easy to test. It is lightweight at 2KB not burdening the application’s asset size. With Redux, the state of your application is kept in a store, and each component can access any state that it needs from this store. Let’s dive a little deeper to see why you might need a state management tool.
Why do we need Redux?
In an app where data is shared among components, it might be confusing to actually know where a state should live. Ideally, the data in a component should live in just one component, so sharing data among sibling components becomes difficult. For instance, in LWC, to share data among siblings, a state has to live in the parent component. A method for updating this state is provided by the parent component and passed as props to these sibling components.
Basics of Redux
Redux is best explained using a box metaphor. You could think of Redux as a box.
- The box organizes the state in a simple place
- You can ask the box what is the current state.
- You can describe changes in the state of the box.
- The box will notify changes to subscribers.
Core Principles of Redux:
- The state of the app is stored in one JavaScript object.
- The state is read-only, but we can change the state by describing a change with another JavaScript object called action.
- Changes are executed by pure functions called reducers. A reducer accepts the current state and an action and returns a new state or the same state.
The store is the core of the library and it wires the three principles up. The store contains three methods:
- getState
- dispatch
- subscribe
State management flow in Redux is shown in the below figure:
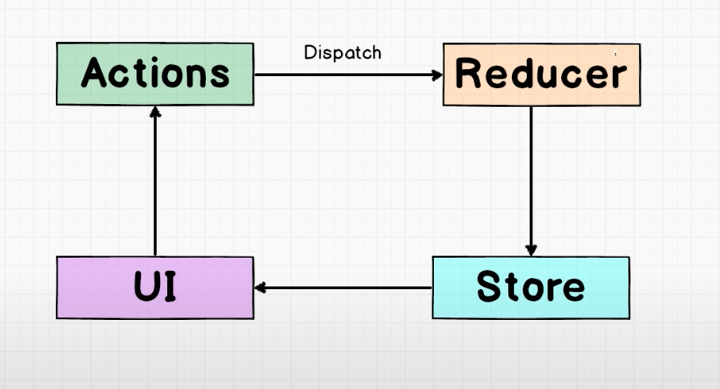
In this blog, let’s build an LWC app that dispatches and stores user responses to Redux Store using lwc-redux library by Chandra Kiran. Inside the app, a user can select what level of the job he/she is interested in. The user is allowed to change the selections. Redux will help us track the count of selections and log previous selection along with the current state of selection in-app as well as console. Whenever an interaction is done inside the LWC component(button click, search key, etc) Redux dispatch action invoking Reducer inside the Store which creates a new State that will be returned to the UI.
First, install the LWC-redux using the command below:
sfdx force:package:install --package 04t2v00000799S7AAI
You can download the full code here and deploy it to your org. Below is the quick walkthrough of the code.
The provider is a lightning web component, which makes the Redux store available for your application. Your root component should be the child of the
<!-- jobContainer.html -->
<template>
    <c-provider oninit={initialize} store={store}>
        <c-job></c-job>
    </c-provider>
</template>
// jobContainer.js
import { LightningElement, api } from 'lwc';
import {createStore, combineReducers} from 'c/lwcRedux';
import reducers from 'c/jobReducers';
export default class CounterContainer extends LightningElement {
    @api store;
    initialize(){
        const combineReducersInstance = combineReducers(reducers);
        this.store = createStore(combineReducersInstance);
    }
}
Now lets build our LWC component with question for user that directly interacts with Redux store as shown below:
<!-- job.html -->
<template>
    <lightning-card  variant="Narrow"  title="State management in LWC using Redux by SFDC Brewery" icon-name="standard:account">
        <p class="slds-text-heading_large slds-p-top_medium slds-align_absolute-center"> Job Level Selected: {props.joblevel} </p> </br>
        <p class="slds-text-heading_large slds-p-top_medium slds-align_absolute-center"> Numbers of selections made: {props.counter}</p></br>
        <h2 class="slds-text-heading_medium slds-align_absolute-center slds-m-bottom_small slds-p-top_medium">
            What is job Level are you interested in?
        </h2>
        <lightning-button variant="brand-outline" label="Entry Level" title="Looks like a link" onclick={props.entry} class = "slds-align_absolute-center"></lightning-button>
        <lightning-button variant="brand-outline" label="Mid Level" title="Looks like a link" onclick={props.mid} class = "slds-align_absolute-center slds-p-top_medium"></lightning-button>
        <lightning-button variant="brand-outline" label="Expert Level" title="Looks like a link" onclick={props.expert} class = "slds-align_absolute-center slds-p-top_medium"></lightning-button>
    </lightning-card>
</template>
LWC-redux provide the predefined property called props in the ReduxElement. All the store data and dispatch functions will accessible with this property in your component. This will helps you to access the store data and the action function.
mapStateToProps is part of lwcRedux used to get the data from the store.
- It is called every time the store state changes.
- It receives the entire store state and should return an object of data this component needs.
mapDispatchToProps is also part of is part of lwcRedux used for dispatching actions to the store.
With LWC Redux, your components never access the store directly - ReduxElement does it for you. This method will dispatch the function and associate them to props of your component.
// job.js
import { ReduxElement } from 'c/lwcRedux';
import {entry, mid, expert} from 'c/jobActions';
export default class job extends ReduxElement {
    mapStateToProps(state){
        return {counter: state.counter, joblevel: state.joblevel};
    }
    mapDispatchToProps(){
        return { entry, mid, expert};
    }
}
Here is how your store with reducers will look like:
//jobReducers.js
import {ENTRY_ACTION, MID_ACTION, EXPERT_ACTION} from 'c/jobConstant';
const reducer = (counter = -1, action) => {
    switch (action.type) {
       default: return counter + 1;
    }
}
const optionreducer = (joblevel = '', action) => {
    switch (action.type) {
       case ENTRY_ACTION: return 'Entry Level';
       case MID_ACTION: return 'Mid Level';
       case EXPERT_ACTION : return 'Expert Level';
       default: return joblevel;
    }
}
export default {
    counter: reducer,
    joblevel: optionreducer
}
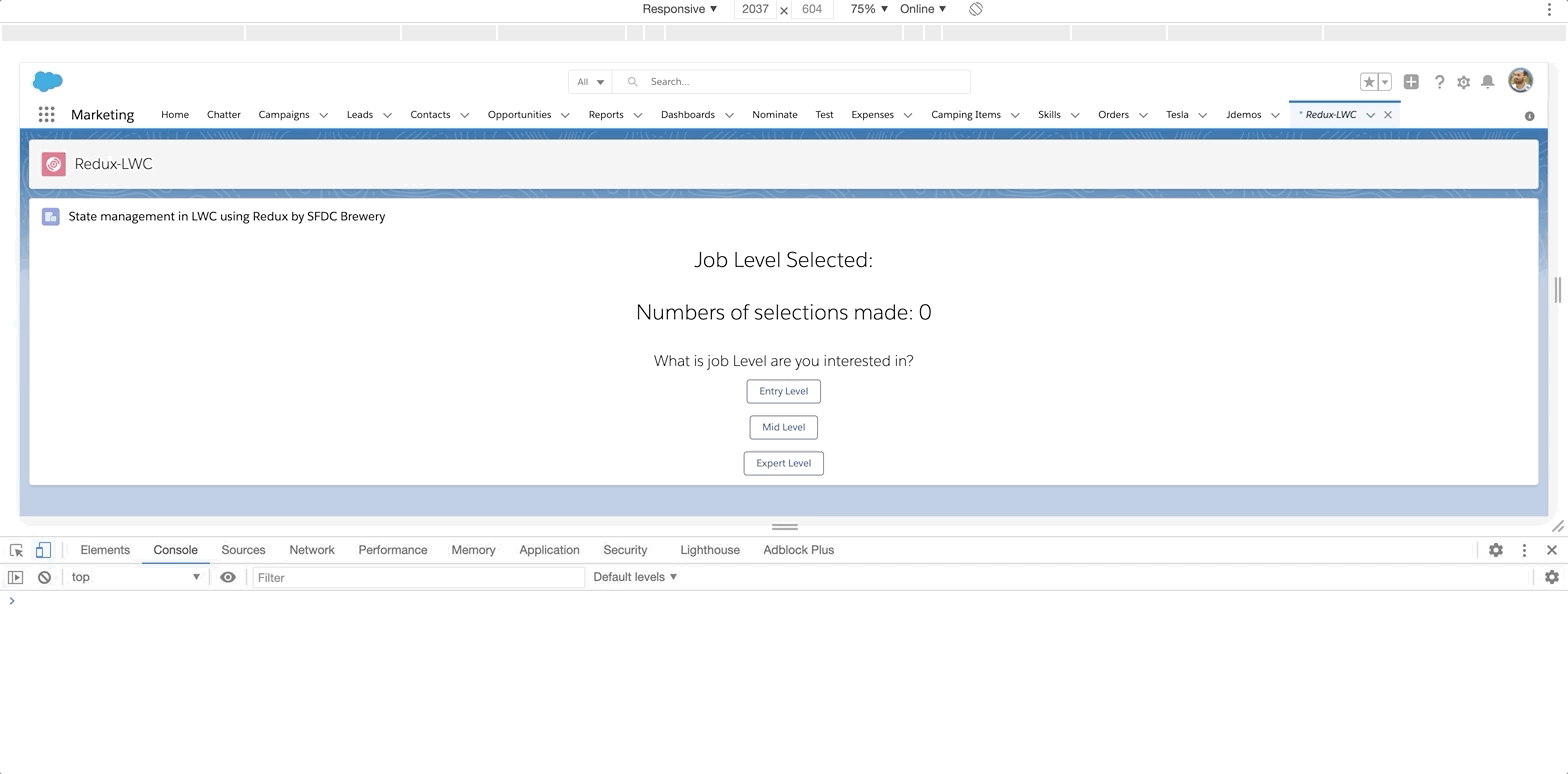
This is how the app would look like once deployed:
While Redux has a lot of advantages it does come with a few Cons as mentioned below:
- Every keypress in any of the fields needs to dispatch an action.
- Each action would need to be handled by a reducer, but each element of the form would need their own action/reducer pair, or the actions and reducers might get very complicated (and coupled, which we want to avoid if possible) very quickly.
- Most forms will need some sort of validation. We need an @ sign in the email form but should not allow them to be entered in the first and last name. More complexity. More code checking, More bugs.
Resources:
1) lwc-redux 2) Redux basics
Tags: SFDC Brewery Sri Kolagani LWC Redux Salesforce DEVs Lightning Web Components