Writing Transaction security policies using APEX
Transaction Security is a feature that monitors Salesforce events in real time and applies actions and notifications based on rules you create. These rules, or policies, are applied against events in your org. (In the earlier example, our policy was to have no more than three active sessions per user.) You create policies for certain event combinations, and specify actions to take when those events occur. Policies move through three states:
- Available—Any policy you create, plus the example policies that Salesforce supplies.
- Enabled—Available policies that the admin has “turned on,” shown by having Enabled checked.
- Triggered—A policy that’s been activated. This happens when the event the policy monitors not only occurs, but occurs in such a way that the event meets the policy’s requirements.
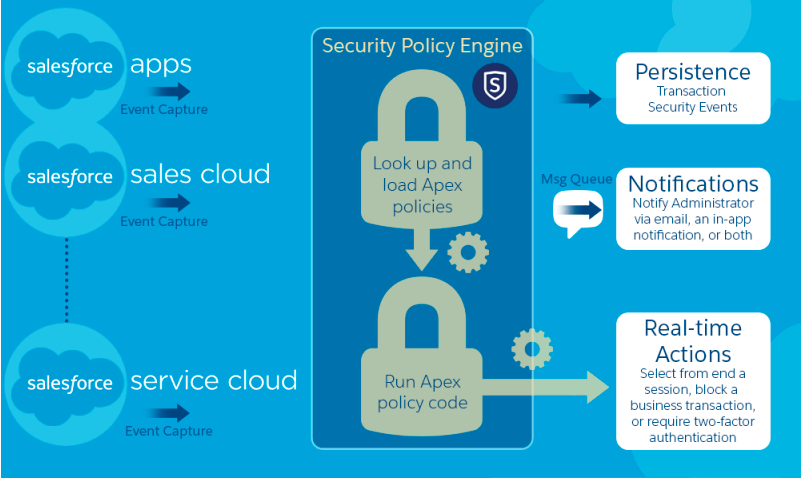 A transaction security policy consists of events, notifications, and actions.
- The available event types are:
- Data Export for Account, Case, Contact, Lead, and Opportunity objects. Prevents unauthorized downloads.
- Entity for authentication providers and sessions, client browsers, and login IP. Provides notification when a specific resource (entity) is accessed.
- Logins. Limits sessions or requires additional authentication.
- Access Resource for connected apps and reports and dashboards. Blocks access to sensitive information or requires two-factor authentication before access is allowed. * Policy notifications are sent to the selected admin using:
- In-app notification to your Salesforce app
- Both email and in-app notifications
- No notifications (notifications are optional) * If the policy is triggered, you can:
- Block the operation
- Require a higher level of assurance using two-factor authentication
- End a current session
- Receive a notification
- Do nothing at all (useful for testing) You can do a lot with these pieces. Here are some ideas. * Lock out specific geographical areas—Your org has remote offices and a global presence. To comply with international law, you want to restrict access to the Salesforce org. Set up policies to limit access from specific countries or to obtain alerts when unusual login activity occurs, like the same user logging in from two different places. * Securely access confidential data—You have sensitive, confidential data in your quarterly Salesforce dashboards. You want to ensure that teams accessing the dashboards use two-factor authentication (2FA) before viewing this data. Create a policy monitoring specific reports and requiring everyone to use 2FA before getting access. These examples are just a few of the things you can do with Transaction Security. Look at the online help examples for more ideas.
In-order to enable the Transaction Security, go to Setup and enter Transaction in the Quick Find box, press Return, and click Transaction Security. If you’ve never visited this page before, select Enable custom transaction security policies and click Save to activate Transaction Security and install the supplied policies.

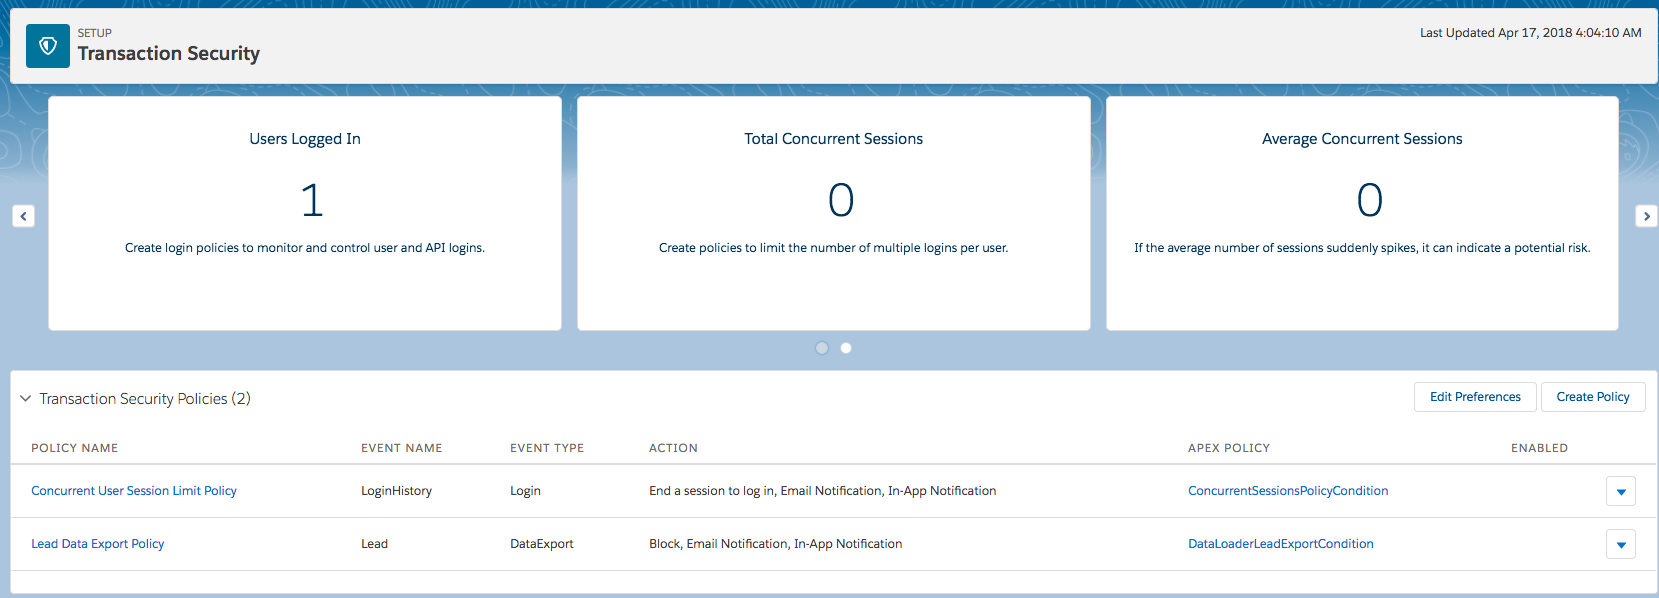
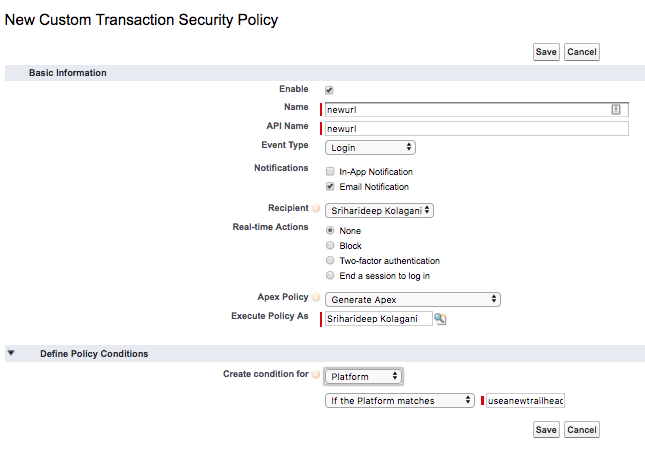
You can also create custom polices as shown in the picture below:
Filter Policies to Ease Viewing
You can filter according to these values:
- Apex class name
- Event type
- Policy name
- Whether the policy is enabled
It is also a good idea to create custom view of the transaction policies.
Using Apex in Transaction policies: To fine-tune a policy, such as having it trigger for a very specific event, editing the Apex is the way to go. Transaction Security provides a way for you to edit your code, so you don’t need a special software development environment.
- An Apex class is a self-contained unit of code. The name of the class is a handy way to refer to what it does. Transaction Security uses the Event class to contain event information for all policies. There’s also one class for each policy implementation, and we’ll call it the policy’s class. A policy class is named by concatenating the policy’s API name with “PolicyCondition”, so each class has a unique name.
- Implementing something means writing the code for a class. The initial implementation is automatic. Remember the Generate Apex option when you created the policy? That option tells Transaction Security to write the policy’s code for you as a class.
- An interface connects two things, for example, the event we’re watching for and the action we want to take when the event occurs. Transaction Security uses the PolicyCondition interface to evaluate events against a policy. Each policy has a unique interface implementation because each policy is different.
Lets go ahead and create a custom policy using Apex which blocks the users from logging in from North Korea. The policy class looks like below:
global class BlockAccessFromNKPolicyCondition implements TxnSecurity.PolicyCondition {
  public boolean evaluate(TxnSecurity.Event e) {
    // Get the login history.
    LoginHistory loginAttempt =
      [SELECT LoginGeoId FROM LoginHistory WHERE Id = :e.data.get('LoginHistoryId')];
    // Get the login's geographical info.
    String loginGeoId = String.valueOf(loginAttempt.LoginGeoId);
    LoginGeo loginGeo = [SELECT Country FROM LoginGeo WHERE Id = :loginGeoId];
    // Get the country at that location.
    String country = String.valueOf(loginGeo.Country);
    // Trigger policy and block access for any user trying to log in from North Korea.
    if(country.equals('North Korea')) {
        return true;
    }
    return false;
  }
}
Some of the use cases that can be to get started with:
- Block Localhost Login
- Block Large Data Export
- High-Assurance Session
- Restricting Platform Browser
- Block Access by Geography
- Block Specific Words in Chatter Posts
- Limit using Apex API Callouts
- Block Connected App Access
- Block a Connected App with API access from accessing large amounts data.